
For DIY enthusiasts, there’s nothing more satisfying than transforming a space with LED strips — but incorrect wiring can burn out your strips, cause short circuits, or even create safety hazards.
Here’s a complete, practical guide: including real-case warnings, required materials, step-by-step wiring instructions, power supply calculations, common mistakes, and troubleshooting tips — everything you need to turn your project from a “pitfall” into a dazzling LED showcase.
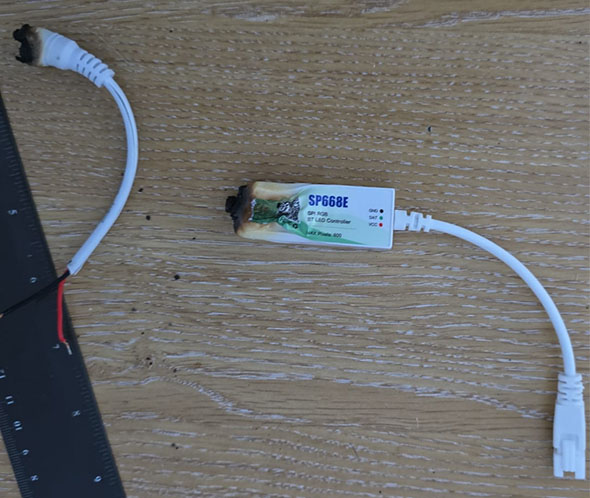
A Real Lesson
John from Qatar thought his project was finished.
He installed a 16.4 ft (5 m) LED strip in his living room, powered it on, and everything looked perfect.
But after several weeks of normal use, the controller suddenly failed. The culprit wasn't a defective product—it was an incorrect wiring and power configuration that had gone unnoticed during installation.
A new controller, extra shipping costs, project delays, and unnecessary frustration all followed.
The frustrating part? Every one of these problems could have been avoided. More details about John: //www.ledworker.com/qatar-led-strip-failure-case.html
That's exactly why we created this guide—to help you get your LED strip installation right the first time.
1. Preparation Checklist (Check Before You Start)
LED Strip: Check the working voltage on the label (usually 12V or 24V) and the power per meter/foot (W/m or W/ft).
Controller: Match the type of strip — single-color, CCT (tunable white), RGB, RGBW, or addressable controller.
Power Supply (Adapter): Voltage must match the LED strip, and rated power ≥ total strip power × safety margin (recommended 20–30%).
Connectors or Soldering Kit: Either soldering tools or solderless connectors, plus necessary screw terminals, quick connectors, etc.
Wires: Use appropriate wire gauge (see current calculation and wire gauge recommendations below).
Tools: Electrical tape, multimeter, wire cutters, wire strippers, heat shrink tubing (recommended), etc.
Safety Gear: Insulating gloves, circuit breaker protection (especially for temporary testing), etc.

2. Understand the LED Strip Structure and Circuit Type First (Why It Matters)
2.1 There are two common circuit types for LED strips:
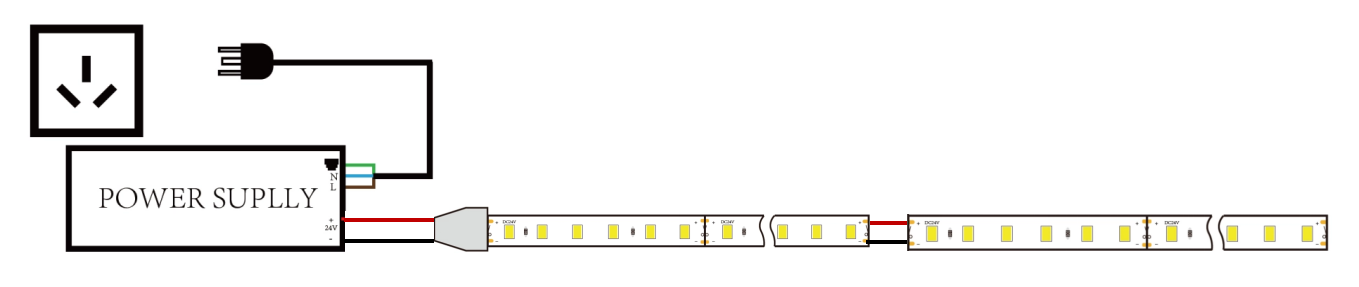
Series / Series-Parallel Hybrid (often found in older models or special LED arrangements):
In a pure series circuit, a single point of failure can cause the entire segment to dim or go out.

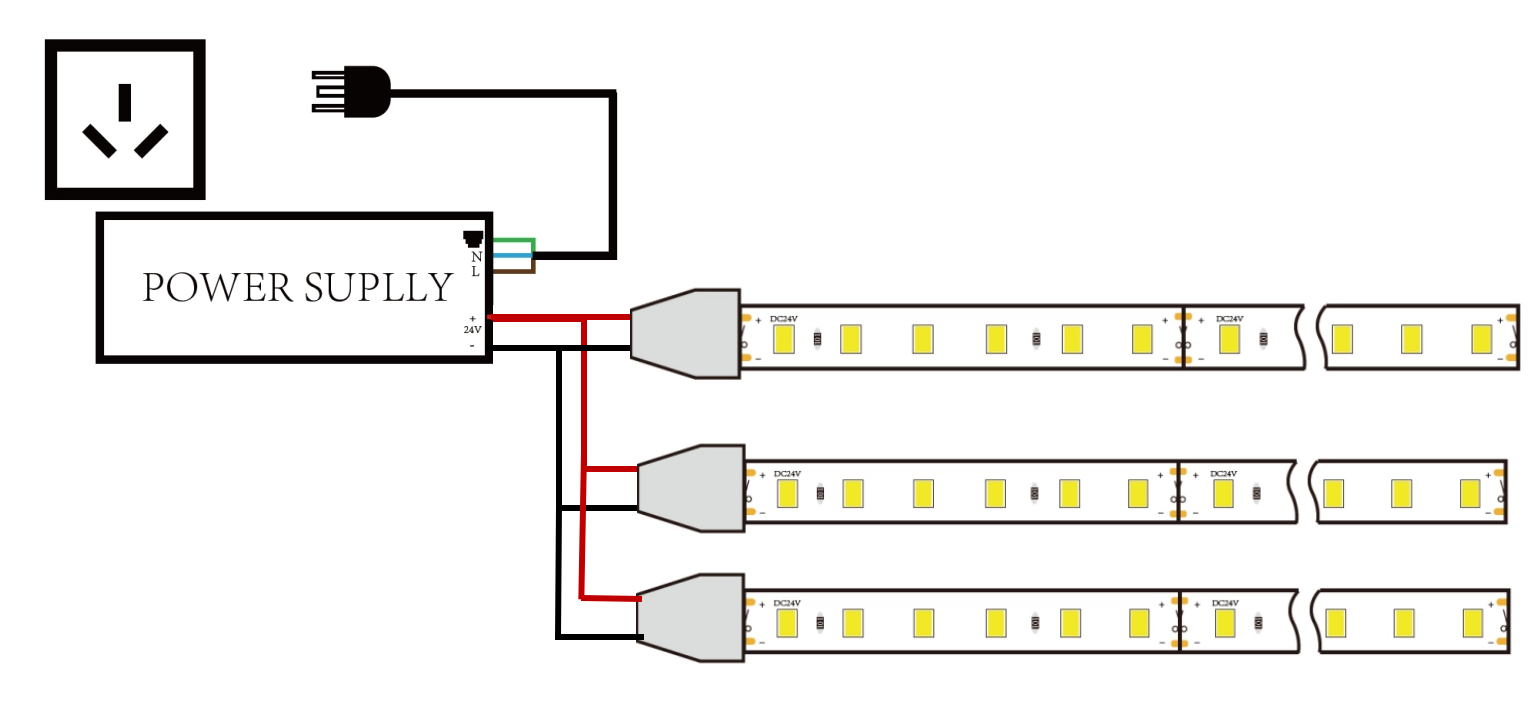
2.2 Parallel (commonly used in modern strips):
Each segment receives the same voltage in parallel, so a local failure does not affect the rest of the strip.

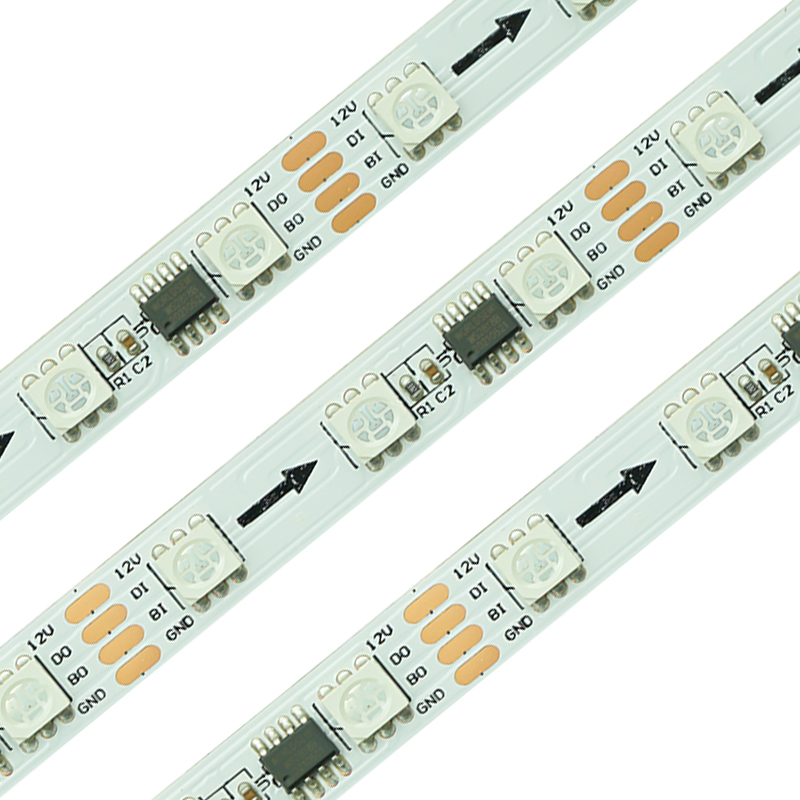
2.3 Addressable LED Strips: Don't Ignore the Arrow
Unlike single-color LED strips, addressable LED strips (such as WS2812B and SK6812) require one extra thing to pay attention to when connecting multiple strips:
👉 The data direction.
The data signal travels in only one direction, following the arrow printed on the PCB.
DIN (Data In): Connects to the controller or the DOUT of the previous strip.
DOUT (Data Out): Connects to the DIN of the next strip.
Arrow: Indicates the direction in which the data signal flows.
The data signal travels in only one direction, following the arrow printed on the PCB.
DIN (Data In): Connects to the controller or the DOUT of the previous strip.
DOUT (Data Out): Connects to the DIN of the next strip.
Arrow: Indicates the direction in which the data signal flows.
If the strip is connected in the wrong direction, the data signal cannot reach the LEDs correctly.
What happens if you connect it backwards?
❌ Nothing lights up
The data signal never reaches the LED ICs.
❌ Only the first section works
The following strips receive no data.
❌ Colors flicker or become incorrect
The data timing is disrupted, causing unstable operation.
❌ Nothing lights up
The data signal never reaches the LED ICs.
❌ Only the first section works
The following strips receive no data.
❌ Colors flicker or become incorrect
The data timing is disrupted, causing unstable operation.
Before powering on, always check that the arrows point in the direction of the data flow. It's a simple step that can save hours of troubleshooting.
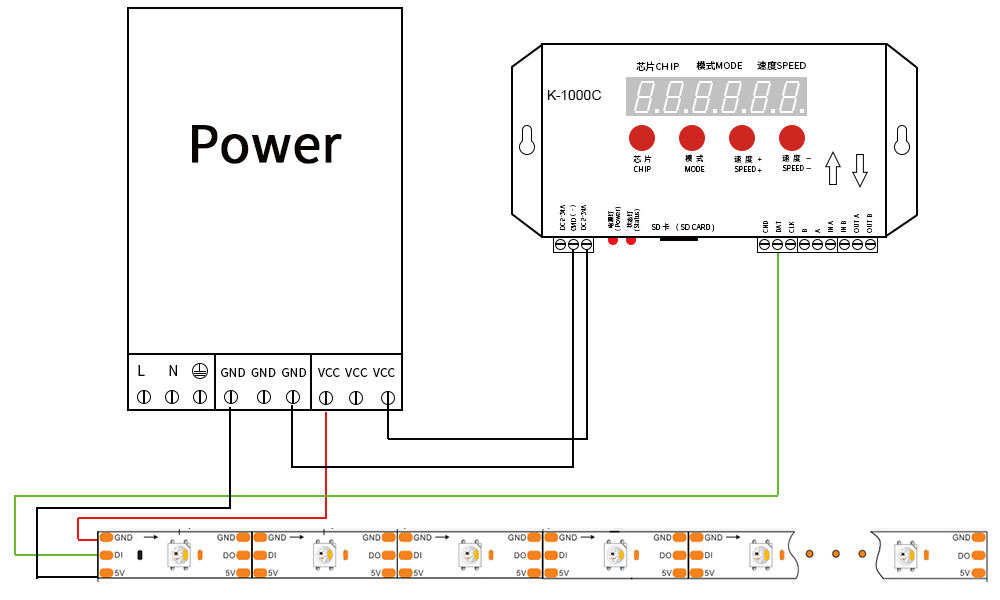
2.4 Don't Overload Your Controller
In John's case, the controller burned out because the connected LED strip required more current than the controller's maximum output rating.
A common mistake is allowing all of the strip's current to pass through the controller.
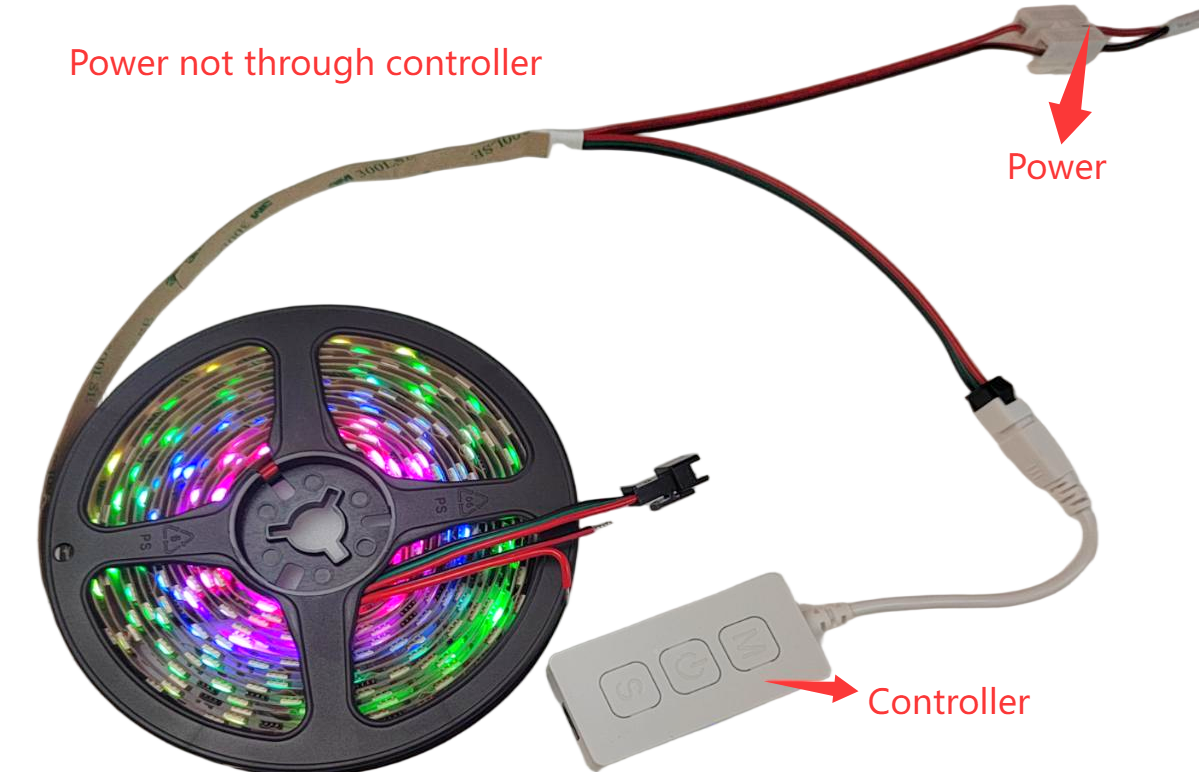
If the LED strip's current exceeds the controller's rated output, connect the LED strip and the power supply in parallel, as shown below.
This way:
The controller only handles the control signal (and its rated output current).
The power supply delivers the high current directly to the LED strip.
The controller is protected from overload.
The system operates more reliably, especially with longer or higher-power LED strips.
This way:
The controller only handles the control signal (and its rated output current).
The power supply delivers the high current directly to the LED strip.
The controller is protected from overload.
The system operates more reliably, especially with longer or higher-power LED strips.
Always check the controller's maximum output current before installation.
(See the wiring diagram below.)
3. Power and Current Calculation (Example with Step-by-Step Arithmetic)
Before installation, always calculate the total power and current to avoid selecting an underpowered supply that could burn out the strip.
Example (John’s Case):
Strip Length: 16.4 ft
Power per Foot: 4.8 W/ft (as provided by the user)
Strip Length: 16.4 ft
Power per Foot: 4.8 W/ft (as provided by the user)
Step-by-step arithmetic (to ensure accuracy):
16.4 × 4.8 = ?
16.4 × 4.8 = (164 × 48) ÷ 100
164 × 48 = (160 × 48) + (4 × 48) = 7680 + 192 = 7872
7872 ÷ 100 = 78.72 W (total strip power)
16.4 × 4.8 = ?
16.4 × 4.8 = (164 × 48) ÷ 100
164 × 48 = (160 × 48) + (4 × 48) = 7680 + 192 = 7872
7872 ÷ 100 = 78.72 W (total strip power)
For a 12V strip: Current = 78.72 ÷ 12 = 6.56 A
For a 24V strip: Current = 78.72 ÷ 24 = 3.28 A
Power Supply Recommendation:
Total Power 78.72 W × suggested margin 25% = 78.72 × 1.25 = 98.4 W → choose a ≥100 W power supply (matching the voltage).
Conclusion: John’s original claim of “60W needed” was incorrect. The correct choice is about 100 W (or one tier higher) 12V power supply to ensure sufficient margin.
4. Wire Gauge and Conductor Selection (Rough Reference)
Low-voltage DC (12V/24V) is sensitive to current; wires that are too thin can overheat and cause significant voltage drop. Common recommendations (for reference only):
< 5 A: 22–20 AWG (~0.3–0.5 mm²)
5–10 A: 20–18 AWG (~0.5–0.75 mm²)
10–15 A: 16 AWG (~1.0–1.5 mm²) or thicker
5–10 A: 20–18 AWG (~0.5–0.75 mm²)
10–15 A: 16 AWG (~1.0–1.5 mm²) or thicker
(For John’s 6.56 A on a 12V system, 18 AWG or thicker is recommended to ensure safety and reduce voltage drop.)

5. Step-by-Step Wiring Procedure (Example: 12V Single-Color Strip)
Power Off — Ensure the power supply is disconnected before starting any work.
Confirm Polarity — Check the strip’s solder pad markings with a magnifier; usually “+12V” or “+” is positive, “–” is negative.
Measure and Cut (if needed) — Cut along the marked cutting line on the strip.
Confirm Polarity — Check the strip’s solder pad markings with a magnifier; usually “+12V” or “+” is positive, “–” is negative.
Measure and Cut (if needed) — Cut along the marked cutting line on the strip.

Connection Method:
Solderless Connector: Insert the strip into the corresponding slot, press to lock, and check that the conductive clip contacts the pad.

Soldering: Strip the wires, solder carefully, and use heat shrink tubing for insulation (recommended).

Connect to Controller — Attach the strip’s output wires to the controller’s output, ensuring correct polarity and matching pin count.
Controller to Power Supply — Connect the controller’s power input to the power supply output, ensuring secure connections.
Power-On Test — Turn on the power, test a small section briefly for brightness and heat. If normal, proceed to fix the strip in place.
Controller to Power Supply — Connect the controller’s power input to the power supply output, ensuring secure connections.
Power-On Test — Turn on the power, test a small section briefly for brightness and heat. If normal, proceed to fix the strip in place.
6. Additional Points for RGB / RGBW / Addressable (Digital) Strips
Different Pin Counts: RGB strips typically have 4 pins (R, G, B, +V), RGBW strips have 5 pins (+W), and RGBCCT / Addressable strips are more complex—always follow the strip’s labeled connections.
Controller: Use a controller matching the strip type (single-color controllers cannot drive RGB). Addressable strips usually require digital signals (single-wire or differential), so wiring and controllers differ from standard analog RGB.
Higher Power: Color strips can draw higher peak power at full white/full brightness. When calculating power, use the worst-case scenario (all channels at maximum).
Signal Distance & Attenuation: Wireless remote/control distance differs from amplifiers; for long strips, if the controller cannot reach, use a signal amplifier/regenerator or multiple parallel controller outputs.
7. Common Mistakes and How to Avoid Them (Practical Checklist)
1. Using the Wrong Voltage
Mistake
Connecting a 24V LED strip to a 12V power supply—or vice versa.
Mistake
Connecting a 24V LED strip to a 12V power supply—or vice versa.
What happens?
❌ The strip may not light up.
❌ LEDs or the controller may be damaged.
❌ The strip may not light up.
❌ LEDs or the controller may be damaged.
How to avoid it
Always check the voltage label on the LED strip, power supply, and controller before connecting them.
2. Choosing an Undersized Power Supply or Overloading the Controller
This is exactly what happened in John's case.
His LED strip worked normally at first, but after a period of use, the controller burned out because the system drew more current than the controller was designed to handle.
This is exactly what happened in John's case.
His LED strip worked normally at first, but after a period of use, the controller burned out because the system drew more current than the controller was designed to handle.
Common mistakes
Using a power supply with insufficient wattage.
Connecting a high-power LED strip so that all current passes through the controller.
What happens?
❌ Controller overheating or failure
❌ Power supply overheating
❌ Flickering or unstable brightness
Using a power supply with insufficient wattage.
Connecting a high-power LED strip so that all current passes through the controller.
What happens?
❌ Controller overheating or failure
❌ Power supply overheating
❌ Flickering or unstable brightness
How to avoid it
- Choose a power supply with 20–30% spare capacity.
- If the LED strip requires more current than the controller's rated output, connect the power supply and LED strip in parallel, while the controller provides only the control signal.
(See the wiring diagram below.)

3. Wiring Addressable LED Strips Incorrectly
Unlike single-color LED strips, addressable LED strips (such as WS2812B and SK6812) have a one-way data signal.
Always connect:
Unlike single-color LED strips, addressable LED strips (such as WS2812B and SK6812) have a one-way data signal.
Always connect:
- DIN → Controller or previous strip's DOUT
- DOUT → Next strip's DIN
- Follow the arrow printed on the PCB.
Also make sure the power polarity (+ and –) is correct.
What happens?
❌ Nothing lights up
❌ Only the first section works
❌ Colors flicker or become incorrect
❌ Reversed polarity may permanently damage addressable LED strips.
❌ Nothing lights up
❌ Only the first section works
❌ Colors flicker or become incorrect
❌ Reversed polarity may permanently damage addressable LED strips.
How to avoid it
Always double-check both the arrow direction and the positive/negative terminals before powering on.
4. Poor Connections
Common mistakes
Common mistakes
- Loose solderless connectors
- Poor wire connections
- Insufficient strain relief
What happens?
❌ Flickering
❌ Intermittent lighting
❌ Random power loss
❌ Flickering
❌ Intermittent lighting
❌ Random power loss
How to avoid it
Secure solderless connectors with heat-shrink tubing and provide proper strain relief to prevent movement.
5. Powering Long LED Strips from One End Only
What happens?
❌ Voltage drop
❌ Dimmer LEDs toward the end of the strip
❌ Uneven brightness
What happens?
❌ Voltage drop
❌ Dimmer LEDs toward the end of the strip
❌ Uneven brightness
How to avoid it
Use power injection or feed power from multiple points, especially for long 12V installations.
6. Ignoring Heat and Environmental Protection
Common mistakes
Installing LED strips inside enclosed spaces without ventilation or choosing the wrong IP rating.
Common mistakes
Installing LED strips inside enclosed spaces without ventilation or choosing the wrong IP rating.
What happens?
❌ Higher operating temperatures
❌ Shorter LED lifespan
❌ Premature failure
❌ Higher operating temperatures
❌ Shorter LED lifespan
❌ Premature failure
How to avoid it
Use aluminum profiles or other cooling methods when necessary, and always select the appropriate IP rating for indoor, outdoor, or wet environments.
Quick Installation Checklist
Before switching on your LED strip for the first time, check these six items:
✓ Correct voltage
✓ Adequate power supply and controller rating
✓ Correct data direction and polarity (for addressable strips)
✓ Secure connectors and wiring
✓ Power injection for long runs
✓ Proper cooling and IP protection
✓ Correct voltage
✓ Adequate power supply and controller rating
✓ Correct data direction and polarity (for addressable strips)
✓ Secure connectors and wiring
✓ Power injection for long runs
✓ Proper cooling and IP protection
8. Roubleshooting and Safety Precautions for LED Strip Installation
1. Simple Troubleshooting Flow
Not lighting up: First, measure the power supply output voltage with a multimeter; check whether the controller has a power indicator; verify that the polarity is correct.
Partially not lighting: Inspect the cut points and connector contacts to ensure proper connection; for addressable strips, check the data line connection and timing.
Flickering/color issues: Could be caused by insufficient power supply or poor contact; try using a higher-capacity power supply or redo the connections.
Abnormal heating: Immediately disconnect power and check for overload or short circuit.
Partially not lighting: Inspect the cut points and connector contacts to ensure proper connection; for addressable strips, check the data line connection and timing.
Flickering/color issues: Could be caused by insufficient power supply or poor contact; try using a higher-capacity power supply or redo the connections.
Abnormal heating: Immediately disconnect power and check for overload or short circuit.
2.Safety Precautions (Need To Follow)
Always disconnect the power before any wiring.
Choose a certified power supply (CE/UL, etc.) and ensure sufficient power margin.
If unsure about electrical work, seek assistance from a qualified electrician.
For outdoor or damp environments, use LED strips and connectors with appropriate waterproof ratings and ensure proper sealing.
During long-term testing, have someone monitor it and disconnect power immediately if any abnormalities occur.
Choose a certified power supply (CE/UL, etc.) and ensure sufficient power margin.
If unsure about electrical work, seek assistance from a qualified electrician.
For outdoor or damp environments, use LED strips and connectors with appropriate waterproof ratings and ensure proper sealing.
During long-term testing, have someone monitor it and disconnect power immediately if any abnormalities occur.
9.Conclusion: Be Prepared and Enjoy the Results
Proper preparation and calculation ensure a smooth, worry-free DIY process. Don’t end up like John, losing out due to small mistakes:
Read labels first to confirm voltage and W/length;
Calculate total power and choose a power supply with at least 25% margin;
Select appropriate wire gauge and certified connectors;
For long strips, consider multi-point power injection and signal amplifiers;
Test, secure, seal, and finish properly.
Calculate total power and choose a power supply with at least 25% margin;
Select appropriate wire gauge and certified connectors;
For long strips, consider multi-point power injection and signal amplifiers;
Test, secure, seal, and finish properly.
Follow these steps, and you’ll turn your LED strips into a safe, stable, and stunning decoration.
If you like, I can provide a customized wiring and power supply selection chart based on your specific LED strip model (voltage, power per meter, length, waterproof rating). You can simply paste the specifications of your LED strip, and I’ll calculate everything and give you a wiring diagram freely. Contact Now!
Bulk Purchasing & Customization: Meeting Diverse Needs
When sourcing products, it’s not just about the price. Minimum order quantities, packaging options, and customization capabilities also matter. Flexible low-MOQ full-line supply and tailored services can meet the needs of different markets and projects, making procurement more efficient and worry-free, while helping customers respond quickly in a competitive market.
Recommended News